

Showing posts with label inspired by bloggers. Show all posts
Showing posts with label inspired by bloggers. Show all posts
Monday, August 11, 2014
Teal Butterfly Wing Nail Art
I see butterfly wing nail art everywhere and always admire it, so one day recently when I was in the mood to spend a good chunk of time on a design, I finally gave it a try. This is by no means breaking new ground here, but I did at least attempt to go with a color palette I personally hadn't seen before!
Friday, July 18, 2014
Boom Goes the Blue
This is yet another one of those manicures that turned out very differently from what I was picturing, but that I ended up liking a lot anyway. That feels like the story of my life on this blog sometimes! Must be the "amateur" part of Amateur Manicure...

Tuesday, July 8, 2014
Woodland Waterfall

Monday, May 19, 2014
Journeying Into Orange
I'll admit it: I always thought I hated orange. I know yellow doesn't suit my skin tone at all, and since orange is right there next to yellow on the color spectrum, my assumption has always been that orange is a bad color for me, too. I have no orange clothing or accessories, and only about four bottles of orange (or at least, orange-ish) nail polish that hardly see any use. So needless to say, when I was browsing through Sephora recently and found myself inexplicably drawn to the bright orange shade in Deborah Lippmann's 80's Rewind* collection, I was a teensy bit shocked. "Why am I even buying this polish?!" I asked my husband. "I hate orange!"
*Someone at Deborah Lippmann really needed to consult an editor when creating this collection, because the name should be written as '80s Rewind, not 80's Rewind. Call me, DL!

Tuesday, May 13, 2014
Dotted Birthday Daisies
I went out of town recently for a little birthday getaway, and before I left, I decided to try my hand at some quick floral nail art. I should probably know better than to try a new technique when I'm already in a rush, but... what can I say. I'm just stubborn like that! (Fitting for a Taurus, huh?)

Tuesday, May 6, 2014
Purple Turquoise Stone Nails
I've always been really intimidated by water marbling. I tried it once—sort of—several months ago, but it didn't go well at all and I've generally tried to avoid thinking too much about the technique since then. Because, honestly: a big mess AND nails that look crappy at the end? No thanks!
However, when I saw (and absolutely fell in love with) these turquoise stone nails by Lacquerstyle recently and discovered they were done with a simpler version of water marbling, I decided it was time to bite the bullet and brave using water in a manicure once again.

However, when I saw (and absolutely fell in love with) these turquoise stone nails by Lacquerstyle recently and discovered they were done with a simpler version of water marbling, I decided it was time to bite the bullet and brave using water in a manicure once again.
Thursday, April 10, 2014
Soothing Springtime Waterfall
I was having a rough day recently, so I decided to do some nail art that I knew I'd enjoy creating and that would just make me happy whenever I looked at it.

Friday, March 7, 2014
Springy Stained Glass
The polishes I preordered from the ILNP spring collection arrived recently, and they were all so gorgeous that I just had to do some nail art featuring them all together. They reminded me of beautiful, shiny stained glass all lined up on my table, so that's exactly what I decided to do with them: try my hand at some stained glass nails!
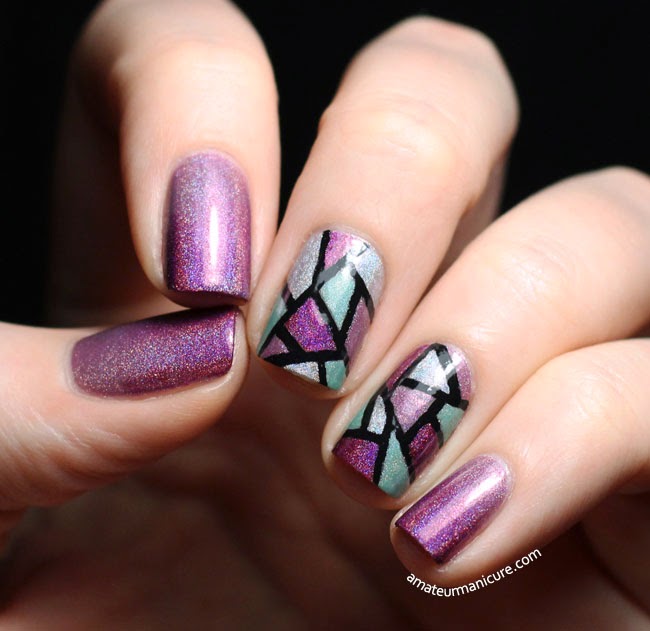
I took my inspiration for this manicure from Will Paint Nails For Food. She's done quite a few beautiful stained glass looks that I've always admired, so I checked out this tutorial to help guide my efforts. I did do things a little differently, however: I had some black acrylic paint on hand, so I used that instead of black polish for the lines. I liked how easy it was to apply and get dark, even coverage, so I will probably reach for the paint again if & when I do this kind of look in the future. I do wish my lines were thinner and less heavy, because I think the stark contrast with the delicate colors I used is probably a bit much, but I'm happy with the results overall. Not too bad for my first try!

As I mentioned, the colors I used are all from the new ILNP spring collection, which I think officially launches today:
I also used Kings & Queens and Dreaming in Violet to do a quick gradient on the fingers without the stained glass, but the result was super subtle! You may not even really be able to see it very well in the pictures. But I do think it added some nice depth to the color on those nails and helped them look less plain compared with the stained glass.

Of the four colors I picked up, I think Kings & Queens is my favorite—I'm a sucker for the deep, gorgeous berry color combined with the holo finish.
What do you think of these polishes? Are you planning to pick up anything from ILNP's spring collection?
Thanks for looking!
I took my inspiration for this manicure from Will Paint Nails For Food. She's done quite a few beautiful stained glass looks that I've always admired, so I checked out this tutorial to help guide my efforts. I did do things a little differently, however: I had some black acrylic paint on hand, so I used that instead of black polish for the lines. I liked how easy it was to apply and get dark, even coverage, so I will probably reach for the paint again if & when I do this kind of look in the future. I do wish my lines were thinner and less heavy, because I think the stark contrast with the delicate colors I used is probably a bit much, but I'm happy with the results overall. Not too bad for my first try!
As I mentioned, the colors I used are all from the new ILNP spring collection, which I think officially launches today:
I also used Kings & Queens and Dreaming in Violet to do a quick gradient on the fingers without the stained glass, but the result was super subtle! You may not even really be able to see it very well in the pictures. But I do think it added some nice depth to the color on those nails and helped them look less plain compared with the stained glass.
Of the four colors I picked up, I think Kings & Queens is my favorite—I'm a sucker for the deep, gorgeous berry color combined with the holo finish.
What do you think of these polishes? Are you planning to pick up anything from ILNP's spring collection?
Thanks for looking!
Monday, February 10, 2014
Adventures in Stamping Post #3: Robots in Love
I have to start this post by saying that I'm incredibly proud of the manicure I have to show you today. I got brave and stepped way, WAY outside my comfort zone for this one, and I'm so pleased with the result!

These cute little robots are from the MoYou Sci Fi Collection Plate 02, which I used to make my own decals. I did a lot of research and watched tons of YouTube videos before attempting this, but in the end, the methods I used are #1 and #2 (as demonstrated by Lucy's Stash in her amazing video tutorials). And I'll be honest: it wasn't as easy for me as she makes it look! I went through a lot of stamping attempts that didn't turn out quite right, and I had a heck of a time getting the finished decals to adhere smoothly to my nails. (Thankfully, my pictures don't really show most of the little air bubbles I accidentally trapped under the decals!). It ended up taking me an entire evening to make six successful decals (three for each hand), but I think it was more than worth it! I wore this manicure for several days and couldn't stop looking at my nails the entire time.

The polishes I used are as follows:

I'm also counting this as a Valentine's Day manicure, because these robots just look so sweet together and I'm convinced they're in love. :)
Anyway, I'd love to hear what you think about making your own decals—hit me up in the comments! Have you tried this before? What worked/didn't work for you? If you haven't tried it, what would you be interested in hearing about/seeing before you do?
Thanks for looking!
These cute little robots are from the MoYou Sci Fi Collection Plate 02, which I used to make my own decals. I did a lot of research and watched tons of YouTube videos before attempting this, but in the end, the methods I used are #1 and #2 (as demonstrated by Lucy's Stash in her amazing video tutorials). And I'll be honest: it wasn't as easy for me as she makes it look! I went through a lot of stamping attempts that didn't turn out quite right, and I had a heck of a time getting the finished decals to adhere smoothly to my nails. (Thankfully, my pictures don't really show most of the little air bubbles I accidentally trapped under the decals!). It ended up taking me an entire evening to make six successful decals (three for each hand), but I think it was more than worth it! I wore this manicure for several days and couldn't stop looking at my nails the entire time.
The polishes I used are as follows:
- Zoya Rue for the base
- essence black stamping polish for the stamped outlines
- Zoya Trixie, Zoya Purity, and a-england Rose Bower for the detail on the decals (all painted in with a small detail brush)
- Julep Joelle for the glitter on the accent nails
I'm also counting this as a Valentine's Day manicure, because these robots just look so sweet together and I'm convinced they're in love. :)
Anyway, I'd love to hear what you think about making your own decals—hit me up in the comments! Have you tried this before? What worked/didn't work for you? If you haven't tried it, what would you be interested in hearing about/seeing before you do?
Thanks for looking!
Wednesday, February 5, 2014
Let's Leopard
I've been doing nail art regularly for about eight months now, but there's one classic look I hadn't tried creating until recently: leopard print!


I used Zoya Odette (a shade from their new Naturel Collection) for the base, and then applied Zoya Marley for the light spots and China Glaze Rendezvous With You for the dark accents.

And just because it's such a lovely color and is my hands-down favorite from the Naturel Collection, here are a couple of swatches of Odette on its own. I think I'll be using this as a base for art quite a bit! It's a perfect transition color between winter and spring, in my opinion.


What about you—do you ever do leopard print nail art? What technique(s) and color combos do you like best?
Thanks for looking!
Now that I've leopard print, I can't believe I didn't do it sooner (and I'll definitely be playing with it more in the future)! I used the technique demonstrated by Sarah at Chalkboard Nails in her video tutorial, and it couldn't have been easier! Because the print doesn't have to look perfect or uniform—and, in fact, looks best when it's not either of those things—her method of using a dotting tool to create the spots works really well.
I used Zoya Odette (a shade from their new Naturel Collection) for the base, and then applied Zoya Marley for the light spots and China Glaze Rendezvous With You for the dark accents.
What about you—do you ever do leopard print nail art? What technique(s) and color combos do you like best?
Thanks for looking!
Friday, January 17, 2014
12th Man Waterfall
The whole city of Seattle is super excited about the Seahawks' playoff run right now—me included! So I decided to try out a waterfall mani (a technique invented and made famous by The Nailasaurus) in Seahawks colors to match my 12th Man jersey and help celebrate the playoff spirit.

This was my first time trying a waterfall look on top of a dark base color, so I had no idea what to expect or whether it would even work, but it turned out great! I think waterfalls are really perfect for showing off your team colors because they're genuinely fun and easy to do, and they look impressive paired with a matching jersey or other accessories.
I used OPI I Saw...You Saw...We Saw...Warsaw for my base color, and the stripes were created with four different polishes:
Galathee, It's Totally Karma, and I Saw...You Saw...We Saw...Warsaw are pretty much my go-to polishes when I want to do something Seahawks-themed. Bandana and Rikki were new additions this time, but I love the extra depth and sparkle that they add to the group.

What do you think—do you like the idea of using team colors in waterfall manis? What team's colors would make the BEST waterfall?

Thanks for looking! GO HAWKS!
This was my first time trying a waterfall look on top of a dark base color, so I had no idea what to expect or whether it would even work, but it turned out great! I think waterfalls are really perfect for showing off your team colors because they're genuinely fun and easy to do, and they look impressive paired with a matching jersey or other accessories.
I used OPI I Saw...You Saw...We Saw...Warsaw for my base color, and the stripes were created with four different polishes:
- Nars Galathee
- FNUG Bandana
- Sephora by OPI It's Totally Karma
- Zoya Rikki
Galathee, It's Totally Karma, and I Saw...You Saw...We Saw...Warsaw are pretty much my go-to polishes when I want to do something Seahawks-themed. Bandana and Rikki were new additions this time, but I love the extra depth and sparkle that they add to the group.
What do you think—do you like the idea of using team colors in waterfall manis? What team's colors would make the BEST waterfall?
Thanks for looking! GO HAWKS!
Thursday, October 17, 2013
31DC2013 Day 7: Black & White Nails
I didn't mean to completely copy someone else's manicure for day 7 of the challenge, but I accidentally did! I wanted to try some waterfall nails, made famous by Sammy over at The Nailasaurus, and I decided to do them in black and white, over a grey base. Well, after I finished the manicure, I went to have a look at all of Sammy's waterfall looks and realized that she did a monochrome waterfall, too—a couple of months ago. Oops! I guess that makes this an homage to her lovely work.

Even if I'm an accidental copycat, I really like how this turned out and I'm definitely going to be doing more waterfall manis in the future. I started with a base of Nars Galathee and then used the brush side of the Nubar nail art "pens" in basic white and black to create the waterfall. (I also used Zoya Trixie and a striping brush to add some silvery accents to the waterfall.) This could've all been done with regular polish and a striping brush, and I'll probably do it that way next time, but I'd just picked up the Nubar pens and wanted to try them out.


How about you guys—have you tried any waterfall manis yet?
Thanks for reading!
Even if I'm an accidental copycat, I really like how this turned out and I'm definitely going to be doing more waterfall manis in the future. I started with a base of Nars Galathee and then used the brush side of the Nubar nail art "pens" in basic white and black to create the waterfall. (I also used Zoya Trixie and a striping brush to add some silvery accents to the waterfall.) This could've all been done with regular polish and a striping brush, and I'll probably do it that way next time, but I'd just picked up the Nubar pens and wanted to try them out.
How about you guys—have you tried any waterfall manis yet?
Thanks for reading!