

Friday, March 28, 2014
The Lacquer Legion: Lucky
It's the last Friday of the month, so it's time for another Lacquer Legion manicure! This time around the ladies who run the challenge chose "lucky" as the theme, and after thinking about it for a little bit, I decided to attempt a more personal take on this prompt than I have for the previous challenges.
Monday, March 24, 2014
OPI Sheer Tinted Stamping
As soon as I saw the press release for the OPI Sheer Tints line, I knew exactly what I wanted to do with these unique polishes. I've seen people execute all kinds of creative looks with them, but what I really wanted to try was painting them over some white-on-black stamping—i.e., the same technique I used for my Painting the Roses Red Valentine's Day manicure.
Much to my delight, it worked fabulously!

Much to my delight, it worked fabulously!
Thursday, March 20, 2014
Mini Matte Mani
Mini Matte Mani... it almost sounds like a long-lost Latin phrase, doesn't it? Or maybe that's just my many years of Latin classes warping my brain...? It's hard to say. :)
Anyway, I digress! I wasn't sure whether I wanted to post this manicure because I still don't know how I feel about it, but as a friend so kindly reminded me when I whined to her, I did learn a few things from the experience. So, I think that alone makes this worth sharing. Thanks, L!
The idea for this look came from a somewhat random place: I was driving home from work one day and saw a Mini Cooper painted this way. I was really drawn to the color combo and the off-center stripes, and I knew I had just the right colors in my polish stash, so I decided to go ahead and recreate the paint job on my nails that very evening.
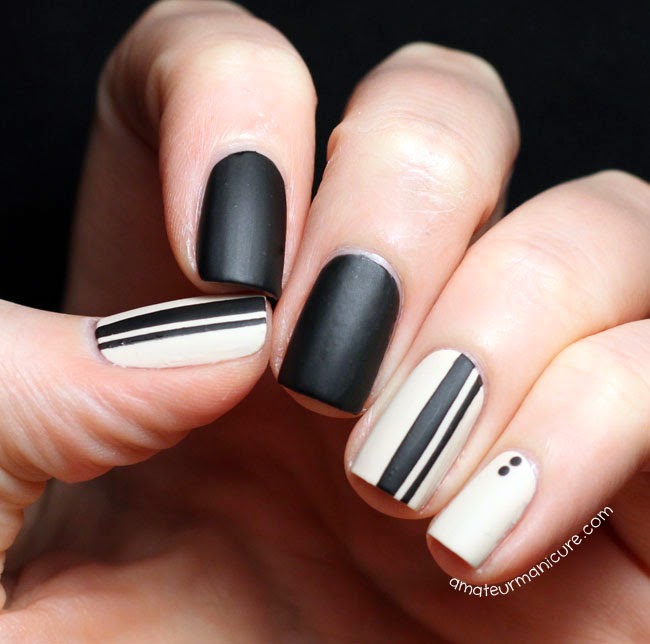
Monday, March 17, 2014
Argyle in Green
I generally don't do much to celebrate St. Patrick's Day, but I do love green, so I couldn't resist adding a little St. Paddy's spirit to my nail art this weekend by using two of my favorite green polishes.

Tuesday, March 11, 2014
Muppets Most Wanted Nail Art
Like every true '80s child, I love the Muppets. I grew up watching reruns of The Muppet Show (I'm just a little too young to have seen the original airings, but not by much!), and even now, I always get excited when a new Muppet movie gets released. So when I started seeing trailers for the upcoming "Muppets Most Wanted" movie, I knew I had to do some nail art to celebrate the occasion.

At first glance, I know this may not seem like the most Muppet-y manicure ever, but bear with me! I'm not really enough of an artist yet to hand-paint cute little Muppet faces on my nails, so I decided to match the characters' outfits (and the movie's logo, in Kermit's case) in this image instead:
I really admire other nail artists' abilities to do super detailed, hand-painted nail art for movies and other events, but I know I'm just not quite there yet. So my goal with this design was to capture the fun, colorful look & feel of the movie using techniques that are generally pretty doable for someone without a lot of amazing art skills (like me!). I feel like I succeeded—at least, I hope I did!
Read on for more details and lots more pictures!
At first glance, I know this may not seem like the most Muppet-y manicure ever, but bear with me! I'm not really enough of an artist yet to hand-paint cute little Muppet faces on my nails, so I decided to match the characters' outfits (and the movie's logo, in Kermit's case) in this image instead:
 |
| Wallpaper by stuartreeves.com and characters ©Disney |
Read on for more details and lots more pictures!
Tutorial: Painting the Roses Red
The fine folks over at Nail It! Magazine asked me to put together a tutorial for what is probably my most popular nail art so far: my "Painting the Roses Red" look from Valentine's Day. I jumped at the chance, of course, and now the tutorial is officially live on their site! Please check it out if you'd like a step-by-step look at this nail art!

Friday, March 7, 2014
Springy Stained Glass
The polishes I preordered from the ILNP spring collection arrived recently, and they were all so gorgeous that I just had to do some nail art featuring them all together. They reminded me of beautiful, shiny stained glass all lined up on my table, so that's exactly what I decided to do with them: try my hand at some stained glass nails!
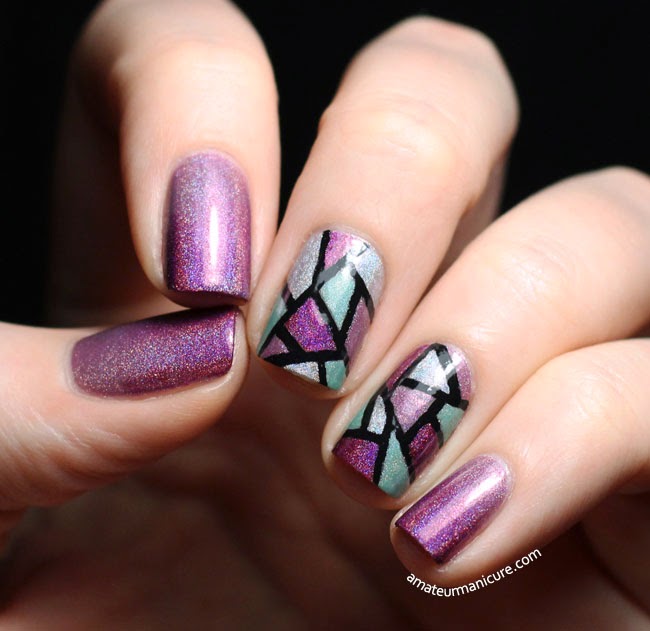
I took my inspiration for this manicure from Will Paint Nails For Food. She's done quite a few beautiful stained glass looks that I've always admired, so I checked out this tutorial to help guide my efforts. I did do things a little differently, however: I had some black acrylic paint on hand, so I used that instead of black polish for the lines. I liked how easy it was to apply and get dark, even coverage, so I will probably reach for the paint again if & when I do this kind of look in the future. I do wish my lines were thinner and less heavy, because I think the stark contrast with the delicate colors I used is probably a bit much, but I'm happy with the results overall. Not too bad for my first try!

As I mentioned, the colors I used are all from the new ILNP spring collection, which I think officially launches today:
I also used Kings & Queens and Dreaming in Violet to do a quick gradient on the fingers without the stained glass, but the result was super subtle! You may not even really be able to see it very well in the pictures. But I do think it added some nice depth to the color on those nails and helped them look less plain compared with the stained glass.

Of the four colors I picked up, I think Kings & Queens is my favorite—I'm a sucker for the deep, gorgeous berry color combined with the holo finish.
What do you think of these polishes? Are you planning to pick up anything from ILNP's spring collection?
Thanks for looking!
I took my inspiration for this manicure from Will Paint Nails For Food. She's done quite a few beautiful stained glass looks that I've always admired, so I checked out this tutorial to help guide my efforts. I did do things a little differently, however: I had some black acrylic paint on hand, so I used that instead of black polish for the lines. I liked how easy it was to apply and get dark, even coverage, so I will probably reach for the paint again if & when I do this kind of look in the future. I do wish my lines were thinner and less heavy, because I think the stark contrast with the delicate colors I used is probably a bit much, but I'm happy with the results overall. Not too bad for my first try!
As I mentioned, the colors I used are all from the new ILNP spring collection, which I think officially launches today:
I also used Kings & Queens and Dreaming in Violet to do a quick gradient on the fingers without the stained glass, but the result was super subtle! You may not even really be able to see it very well in the pictures. But I do think it added some nice depth to the color on those nails and helped them look less plain compared with the stained glass.
Of the four colors I picked up, I think Kings & Queens is my favorite—I'm a sucker for the deep, gorgeous berry color combined with the holo finish.
What do you think of these polishes? Are you planning to pick up anything from ILNP's spring collection?
Thanks for looking!
Tuesday, March 4, 2014
Michael Kors Resort 2014 Nails (Part 2)
Nail art inspired by fashion is one of my absolute favorite things—both to see others do, and to do myself. I did a fashion-inspired look once before, when my blog was still living exclusively on tumblr (and I was still learning how to take decent pictures, eep!), but as it turns out, I guess I wasn't quite finished exploring the possibilities of the Michael Kors Resort 2014 collection. I still might not be, to tell the truth!

All the color blocking, clean lines, and excellent use of patterns in this collection really inspire me and make me want to recreate every single look on my nails. I also adore the colors in this particular look: so smart and classic, but fresh and interesting at the same time. I thought about recreating the whole dress on each nail, but I ultimately decided things would look too cramped and cluttered that way—not at all in the spirit of the collection.

Creating this look was pretty straightforward: I started with a base of Zoya Purity on my pointer and middle fingers, and a base of FNUG Cashmere Sweater on the rest of my fingers. Then I used a dotting tool and Cashmere Sweater & Essie Licorice to add the leopard print pattern to the white nails, as demonstrated in this Chalkboard Nails tutorial. Finally, I taped off the remaining nails and added Licorice to the tips. Everything is finished with a couple coats of topcoat.

I wore these nails for several days, but I still wish I could have worn them longer. I guess that just means I really do need to do another manicure inspired by this collection in the future!

What do you think of nails inspired by fashion? Do you have a favorite designer whose looks you like to see recreated?
Thanks for looking!
All the color blocking, clean lines, and excellent use of patterns in this collection really inspire me and make me want to recreate every single look on my nails. I also adore the colors in this particular look: so smart and classic, but fresh and interesting at the same time. I thought about recreating the whole dress on each nail, but I ultimately decided things would look too cramped and cluttered that way—not at all in the spirit of the collection.
Creating this look was pretty straightforward: I started with a base of Zoya Purity on my pointer and middle fingers, and a base of FNUG Cashmere Sweater on the rest of my fingers. Then I used a dotting tool and Cashmere Sweater & Essie Licorice to add the leopard print pattern to the white nails, as demonstrated in this Chalkboard Nails tutorial. Finally, I taped off the remaining nails and added Licorice to the tips. Everything is finished with a couple coats of topcoat.
I wore these nails for several days, but I still wish I could have worn them longer. I guess that just means I really do need to do another manicure inspired by this collection in the future!
What do you think of nails inspired by fashion? Do you have a favorite designer whose looks you like to see recreated?
Thanks for looking!