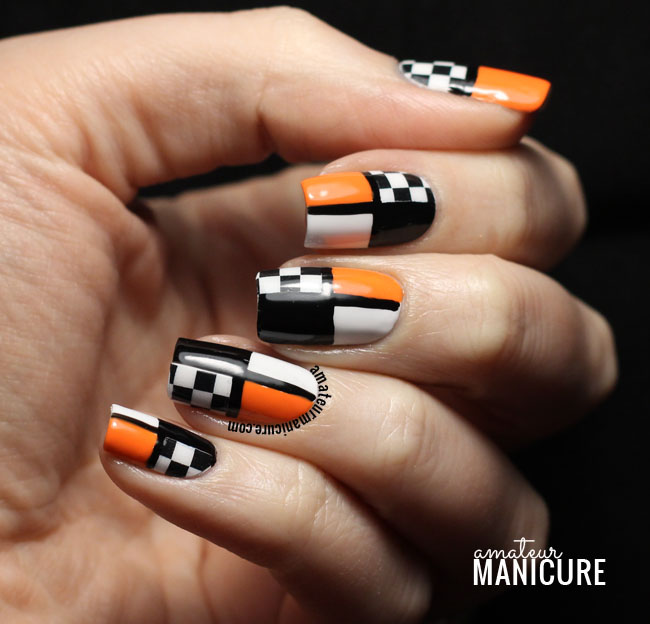
I've been really into black & white and color blocking lately, and I've even learned to really love orange, so going with the Mad for Mod kit was an easy choice for me. Before I started any painting, I spent some time online looking up mod styles and designs and doodling out a bunch of ideas on nail art practice templates. I actually came up with about a half-dozen ideas that I really loved, so expect to see more mod stuff from me down the road!
Before I get into how I created this particular look, I have some brief thoughts on the kit itself. I wasn't sure what to expect, since these are a fairly new product, but I'm happy to report that I was super impressed by everything. From the packaging to the tools & products included, every piece of the kit is very nice quality and works really well. I'd happily recommend the Shine & Sheen kits to anyone and will probably even pick up a couple to give as gifts to some folks I know who are curious about nail art.
On to the art! I challenged myself to use only the materials included in the kit to create this look, and with the exception of my base and top coats (I have to stick to my tried and true favorites there, sorry!), I had no trouble meeting that challenge. They really did include everything I needed!
- I started with a base of the white polish (White Night) on all nails. As you probably know, white polishes can be extremely fussy, but this was honestly the best white polish I've ever used: not chalky or streaky at all, and I got full coverage with two easy coats. So great! I wish I could buy it in bulk.
- Next, after some top coat, I used the black striper (Skinny Black Striper) to divide each nail into four sections. Once that was dry, I started filling in the quadrants: for the orange and black, I used the orange and black polishes (Orange London Pop and Fake Eyelashes, respectively) and just applied them with the brushes from the bottles. If you have small nails, this might be easier with a nail art brush (which you'll have to provide yourself), but the bottle brushes aren't huge, so it worked pretty well for me.
- Finally, after letting all the polish dry, I grabbed the checkerboard nail wraps included with the kit and started cutting out small pieces to fit the fourth quadrant of each nail. This was easily the most time-consuming part of the whole thing! I was cursing myself and my bright ideas about halfway through, but I'm really pleased with the final effect. And it only took two wraps to do both hands, so I still have lots left to play with for other manicures!
Overall, I'm extremely pleased with my Shine & Sheen nail art kit experience. If you've been thinking about picking one of these up, I'd definitely recommend doing so!
Thanks for reading, and also for your kind patience with my relative lack of posting lately. I think my life is settling down some now, so I hope to be back to my more normal posting pace very soon!


Very beautiful. Wondering...... Hummingbirds???
ReplyDeleteHmm, I'm not sure if I can paint a hummingbird... but I will look into some options. :)
DeleteThese are really cute, they kind of remind me of Halloween haha! I love the checkerboard nail wraps :)
ReplyDeleteThanks! And yes, I'll definitely have to bring this kit out again for some more orange/black/white nails come October... :)
Delete