

Showing posts with label pink. Show all posts
Showing posts with label pink. Show all posts
Wednesday, May 20, 2015
ILNP Holo Water Marble
My small collection of ILNP holo polishes is truly precious to me. They were my first introduction to holos, and it's still a joy to use them whenever I pull one out. I was feeling particularly holo-riffic on a recent sunny afternoon, so I decided to go FULL HOLO MANIA and spend a couple of hours creating an all-ILNP-holo water marble that would really sparkle in all that sun. (Have I said "holo" in this paragraph enough yet?)

Thursday, April 23, 2015

Tuesday, April 7, 2015
Playful Pink Floral Nail Art
I'm still here! Illness, work, and some other things have really been kicking my butt lately and eating up my blogging time, but I swear I'm still here. I have had a chance to do a bit of nail art, though, so that's something, right?
Today I have some freehand floral nails to share with you. I haven't done a great many floral patterns in my time as a nail blogger: not because I don't like them, but because I just don't have a lot of confidence that I can execute them well. I recently dug up some inspirational images that I'd saved, though, so I finally decided to take a shot at recreating one of them.

Today I have some freehand floral nails to share with you. I haven't done a great many floral patterns in my time as a nail blogger: not because I don't like them, but because I just don't have a lot of confidence that I can execute them well. I recently dug up some inspirational images that I'd saved, though, so I finally decided to take a shot at recreating one of them.
Friday, February 13, 2015
One More Valentine's Day Manicure

Tuesday, February 10, 2015
Picture Polish Valentine Water Marble
Now that I've discovered liquid latex as a liquid tape option for messy manicures, I'm much more willing to play with nail art techniques that tend to be cleanup-instensive. That's how this Valentinesy water marble was born!

Tuesday, January 20, 2015
Bright & Sparkly Stamped Gradient Nails
Gradients and stamping: they're my go-to techniques when I'm short on inspiration. So on those days when I'm feeling doubly uninspired, a stamped gradient must be the way to go, right? Right!

Wednesday, November 5, 2014
Stitched Gradient Nail Art
Happy November! I can't believe how fast the year is flying by. It's already well into sweater weather where I live, so I decided to embrace the cold temperatures and rock the cozy sweater look on my nails, too.

Tuesday, October 14, 2014
Rosy Ruffian Nail Art
While swatching polishes recently, I decided it was the perfect time to try a technique I see a lot but hadn't gotten around to trying myself yet: the ruffian. I was always intimidated by this look for some reason—getting clean lines between the two colors just seemed so difficult! But once I got started with this, I was relieved to find that it wasn't nearly as hard as I thought.

Friday, September 19, 2014
Stamped Holo Hexagon Nail Art
It's been a while since I've done a full-on stamped manicure. Like, a very long while. I'd like to say that I was just in the mood for other things, but that's only partially true: I also became kind of disillusioned with my plateaued stamping success. I've talked before about making an effort to improve my stamping skills, but I eventually reached a point where even when I tried my best, I just never felt like I could quite get the results I really wanted.
Well, I'm happy to report that there's been a new development: I have some new tools that are finally helping my stamping efforts be successful and, more importantly, fun.

Well, I'm happy to report that there's been a new development: I have some new tools that are finally helping my stamping efforts be successful and, more importantly, fun.
Monday, August 25, 2014
piCture pOlish Blog/Insta Fest 2014
*
I'm beyond excited to be sharing today's post: it's piCture pOlish's Blog/Insta Fest day, and I have the great honor of participating this year!If you haven't heard of the Blog/Insta Fest before, it's a yearly event sponsored by Australian nail polish brand piCture pOlish where selected bloggers share swatches and nail art featuring the company's amazing products. And, this year, we're all featuring Nail Vinyls, too!

This is a long and picture-heavy post, so all the details are behind the cut. Please read on to see my contributions to this year's fest!
Friday, July 25, 2014
Pink & Grey Speckled Stripes
Today's look is pretty simple (and I've got a bit of a family emergency happening this week, unfortunately) so I'll be keeping this post short and sweet. I hope to be back to my usual, long-winded self soon!

Wednesday, June 25, 2014
Easiest Gradient Ever
Gradient manicures are one of my absolute favorite things, but sometimes they're just a little too much work, y'know? Waiting for the base layer to dry, painstakingly sponging on layers, dealing with cleanup—it can take forever! That's why all the thermal polishes popping up these days are so great: if your nails are long enough, you can (sometimes) get that gradient look without all the hassle.

Wednesday, May 28, 2014
Saved by the '80s
After falling in love with one polish from the Deborah Lippmann '80s line, I just had to go back and pick up a couple more of the colors from it. And since these polishes really put me in an '80s state of mind, it only made sense to reach for my MoYou London Back to the '80s stamping plate when the time came to try them out.

Thursday, May 1, 2014
Cyberpunky Holo Stamping
I have a confession to make: I think I'm addicted to holo gradients. I don't know what it is... I've been kind of unenthused about holo polishes in general lately—they're pretty, yes, but they're everywhere, so they just don't excite me too much anymore. But take two or more and sponge them together into a gradient? Oh man, I am so on board for that every single time!

Thursday, April 10, 2014
Soothing Springtime Waterfall
I was having a rough day recently, so I decided to do some nail art that I knew I'd enjoy creating and that would just make me happy whenever I looked at it.

Friday, March 28, 2014
The Lacquer Legion: Lucky
It's the last Friday of the month, so it's time for another Lacquer Legion manicure! This time around the ladies who run the challenge chose "lucky" as the theme, and after thinking about it for a little bit, I decided to attempt a more personal take on this prompt than I have for the previous challenges.

Monday, March 24, 2014
OPI Sheer Tinted Stamping
As soon as I saw the press release for the OPI Sheer Tints line, I knew exactly what I wanted to do with these unique polishes. I've seen people execute all kinds of creative looks with them, but what I really wanted to try was painting them over some white-on-black stamping—i.e., the same technique I used for my Painting the Roses Red Valentine's Day manicure.
Much to my delight, it worked fabulously!

Much to my delight, it worked fabulously!
Friday, March 7, 2014
Springy Stained Glass
The polishes I preordered from the ILNP spring collection arrived recently, and they were all so gorgeous that I just had to do some nail art featuring them all together. They reminded me of beautiful, shiny stained glass all lined up on my table, so that's exactly what I decided to do with them: try my hand at some stained glass nails!
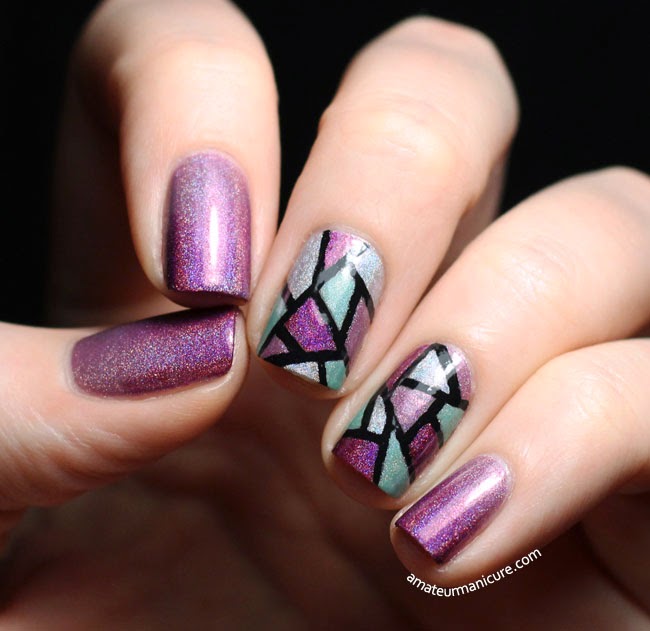
I took my inspiration for this manicure from Will Paint Nails For Food. She's done quite a few beautiful stained glass looks that I've always admired, so I checked out this tutorial to help guide my efforts. I did do things a little differently, however: I had some black acrylic paint on hand, so I used that instead of black polish for the lines. I liked how easy it was to apply and get dark, even coverage, so I will probably reach for the paint again if & when I do this kind of look in the future. I do wish my lines were thinner and less heavy, because I think the stark contrast with the delicate colors I used is probably a bit much, but I'm happy with the results overall. Not too bad for my first try!

As I mentioned, the colors I used are all from the new ILNP spring collection, which I think officially launches today:
I also used Kings & Queens and Dreaming in Violet to do a quick gradient on the fingers without the stained glass, but the result was super subtle! You may not even really be able to see it very well in the pictures. But I do think it added some nice depth to the color on those nails and helped them look less plain compared with the stained glass.

Of the four colors I picked up, I think Kings & Queens is my favorite—I'm a sucker for the deep, gorgeous berry color combined with the holo finish.
What do you think of these polishes? Are you planning to pick up anything from ILNP's spring collection?
Thanks for looking!
I took my inspiration for this manicure from Will Paint Nails For Food. She's done quite a few beautiful stained glass looks that I've always admired, so I checked out this tutorial to help guide my efforts. I did do things a little differently, however: I had some black acrylic paint on hand, so I used that instead of black polish for the lines. I liked how easy it was to apply and get dark, even coverage, so I will probably reach for the paint again if & when I do this kind of look in the future. I do wish my lines were thinner and less heavy, because I think the stark contrast with the delicate colors I used is probably a bit much, but I'm happy with the results overall. Not too bad for my first try!
As I mentioned, the colors I used are all from the new ILNP spring collection, which I think officially launches today:
I also used Kings & Queens and Dreaming in Violet to do a quick gradient on the fingers without the stained glass, but the result was super subtle! You may not even really be able to see it very well in the pictures. But I do think it added some nice depth to the color on those nails and helped them look less plain compared with the stained glass.
Of the four colors I picked up, I think Kings & Queens is my favorite—I'm a sucker for the deep, gorgeous berry color combined with the holo finish.
What do you think of these polishes? Are you planning to pick up anything from ILNP's spring collection?
Thanks for looking!
Wednesday, February 19, 2014
Sweet, Sprinkled Skittle
I don't often find myself gravitating toward super girly pinks and pastels, but as soon as I saw piCture pOlish Frosting online, I knew I had to have it. It just looked so sweet and delicious! However, because this color palette isn't my usual thing, I struggled a bit with how to incorporate the polish into a manicure once it arrived. After pulling out lots of polishes and playing with them for a bit, I finally settled on a good ol' skittle mani to highlight the beautiful, creamy base and colorful glitters in Frosting.

My pointer and middle fingers are two coats of Frosting (and a few coats of topcoat to make everything super smooth). It went on really well and I got exactly one heart glitter per hand, which is what I wanted. My ring finger is a gradient of Julep Nellie and China Glaze Spontaneous (applied with a makeup sponge), and my thumb and pinky are Spontaneous stamped with Zoya Marley and plate 03 from the MoYou Fairytale Collection.
Please excuse the slightly botched stamping job on the corner of my thumbnail—the section of the plate I was using wasn't quite big enough, so I patched it as best I could. (My patching skills still need work, ahem. Adding that to the list of stamping stuff I need to improve!)

As is usually the case whenever I do a skittle mani, I have a favorite nail from the group: this time it's the gradient. I just love how perfectly the two colors transition from one to the other!

Here's a closeup of Frosting, just for fun—don't you wish you had a cupcake or cookie that looked like that on top? I know I do!


I'd love to hear what you think of this look—please hit me up in the comments!
Thanks for looking!
My pointer and middle fingers are two coats of Frosting (and a few coats of topcoat to make everything super smooth). It went on really well and I got exactly one heart glitter per hand, which is what I wanted. My ring finger is a gradient of Julep Nellie and China Glaze Spontaneous (applied with a makeup sponge), and my thumb and pinky are Spontaneous stamped with Zoya Marley and plate 03 from the MoYou Fairytale Collection.
Please excuse the slightly botched stamping job on the corner of my thumbnail—the section of the plate I was using wasn't quite big enough, so I patched it as best I could. (My patching skills still need work, ahem. Adding that to the list of stamping stuff I need to improve!)
As is usually the case whenever I do a skittle mani, I have a favorite nail from the group: this time it's the gradient. I just love how perfectly the two colors transition from one to the other!
Here's a closeup of Frosting, just for fun—don't you wish you had a cupcake or cookie that looked like that on top? I know I do!
I'd love to hear what you think of this look—please hit me up in the comments!
Thanks for looking!
Monday, February 10, 2014
Adventures in Stamping Post #3: Robots in Love
I have to start this post by saying that I'm incredibly proud of the manicure I have to show you today. I got brave and stepped way, WAY outside my comfort zone for this one, and I'm so pleased with the result!

These cute little robots are from the MoYou Sci Fi Collection Plate 02, which I used to make my own decals. I did a lot of research and watched tons of YouTube videos before attempting this, but in the end, the methods I used are #1 and #2 (as demonstrated by Lucy's Stash in her amazing video tutorials). And I'll be honest: it wasn't as easy for me as she makes it look! I went through a lot of stamping attempts that didn't turn out quite right, and I had a heck of a time getting the finished decals to adhere smoothly to my nails. (Thankfully, my pictures don't really show most of the little air bubbles I accidentally trapped under the decals!). It ended up taking me an entire evening to make six successful decals (three for each hand), but I think it was more than worth it! I wore this manicure for several days and couldn't stop looking at my nails the entire time.

The polishes I used are as follows:

I'm also counting this as a Valentine's Day manicure, because these robots just look so sweet together and I'm convinced they're in love. :)
Anyway, I'd love to hear what you think about making your own decals—hit me up in the comments! Have you tried this before? What worked/didn't work for you? If you haven't tried it, what would you be interested in hearing about/seeing before you do?
Thanks for looking!
These cute little robots are from the MoYou Sci Fi Collection Plate 02, which I used to make my own decals. I did a lot of research and watched tons of YouTube videos before attempting this, but in the end, the methods I used are #1 and #2 (as demonstrated by Lucy's Stash in her amazing video tutorials). And I'll be honest: it wasn't as easy for me as she makes it look! I went through a lot of stamping attempts that didn't turn out quite right, and I had a heck of a time getting the finished decals to adhere smoothly to my nails. (Thankfully, my pictures don't really show most of the little air bubbles I accidentally trapped under the decals!). It ended up taking me an entire evening to make six successful decals (three for each hand), but I think it was more than worth it! I wore this manicure for several days and couldn't stop looking at my nails the entire time.
The polishes I used are as follows:
- Zoya Rue for the base
- essence black stamping polish for the stamped outlines
- Zoya Trixie, Zoya Purity, and a-england Rose Bower for the detail on the decals (all painted in with a small detail brush)
- Julep Joelle for the glitter on the accent nails
I'm also counting this as a Valentine's Day manicure, because these robots just look so sweet together and I'm convinced they're in love. :)
Anyway, I'd love to hear what you think about making your own decals—hit me up in the comments! Have you tried this before? What worked/didn't work for you? If you haven't tried it, what would you be interested in hearing about/seeing before you do?
Thanks for looking!